You install Rank Math, the setup wizard flashes past, and suddenly you’re looking at a dashboard with more modules, toggles, and score meters than any other free SEO plugin ships with. That depth is exactly why Rank Math is worth using the free version includes features competitors lock behind paywalls but it’s also why so many new users click through the wizard too fast, leave the wrong pages indexed, and never touch schema at all.
This tutorial fixes that in one pass. You’ll install the plugin, work through the setup wizard properly, configure titles, indexing rules, sitemaps, and schema, learn what the SEO score actually measures, and set up the technical safety net of redirects and 404 monitoring. Then because configuration means nothing if you can’t tell whether it’s working you’ll get a concrete 30/90-day plan for measuring results with the data Rank Math pulls straight from Google Search Console.
Still deciding between plugins? Our Rank Math vs Yoast comparison and full SEO plugin comparison cover that decision. If Rank Math is your pick, let’s configure it correctly from the start.
Why Rank Math and whether free is enough
Rank Math’s free tier is unusually generous. It includes multiple focus keywords per post, a schema generator covering Article, Product, Recipe, FAQ, and How-To types, XML sitemaps, a built-in redirect manager, a 404 monitor, and direct Google Search Console integration. Several of those redirects and 404 monitoring in particular require paid upgrades in Yoast.
The Pro version adds keyword rank tracking, advanced analytics, internal linking suggestions, custom schema builders, unlimited focus keywords, and deeper WooCommerce support. Content AI, Rank Math’s writing and research assistant, is a separate credit-based subscription layered on top even Pro users should think of it as its own add-on.
The honest framing: free is enough to start, and this entire tutorial covers free-tier settings unless noted otherwise. Pro becomes worth evaluating once your site has real content and traffic and you want built-in rank tracking. If you’re weighing that decision, our Rank Math free vs Pro breakdown goes feature by feature.
One prerequisite before installing: deactivate any other SEO plugin (Yoast, AIOSEO, SEOPress). Two plugins managing meta tags simultaneously produce duplicate titles and conflicting canonicals. If you’re switching from Yoast, don’t worry about losing your settings the migration section near the end covers the safe import process.
Step 1: Install the plugin and run the setup wizard
Go to Plugins → Add New, search for “Rank Math SEO,” click Install Now, then Activate. The setup wizard usually launches automatically; if it doesn’t, find it under Rank Math → Dashboard → Setup Wizard.
The wizard is where beginners make their most expensive mistake clicking through without reading. Its choices define your site-wide baseline, so take the ten minutes. Here’s each decision:
Connect your Rank Math account first. Several features, including Content AI and Search Console integration, tie to the account, so register or log in when prompted rather than skipping.
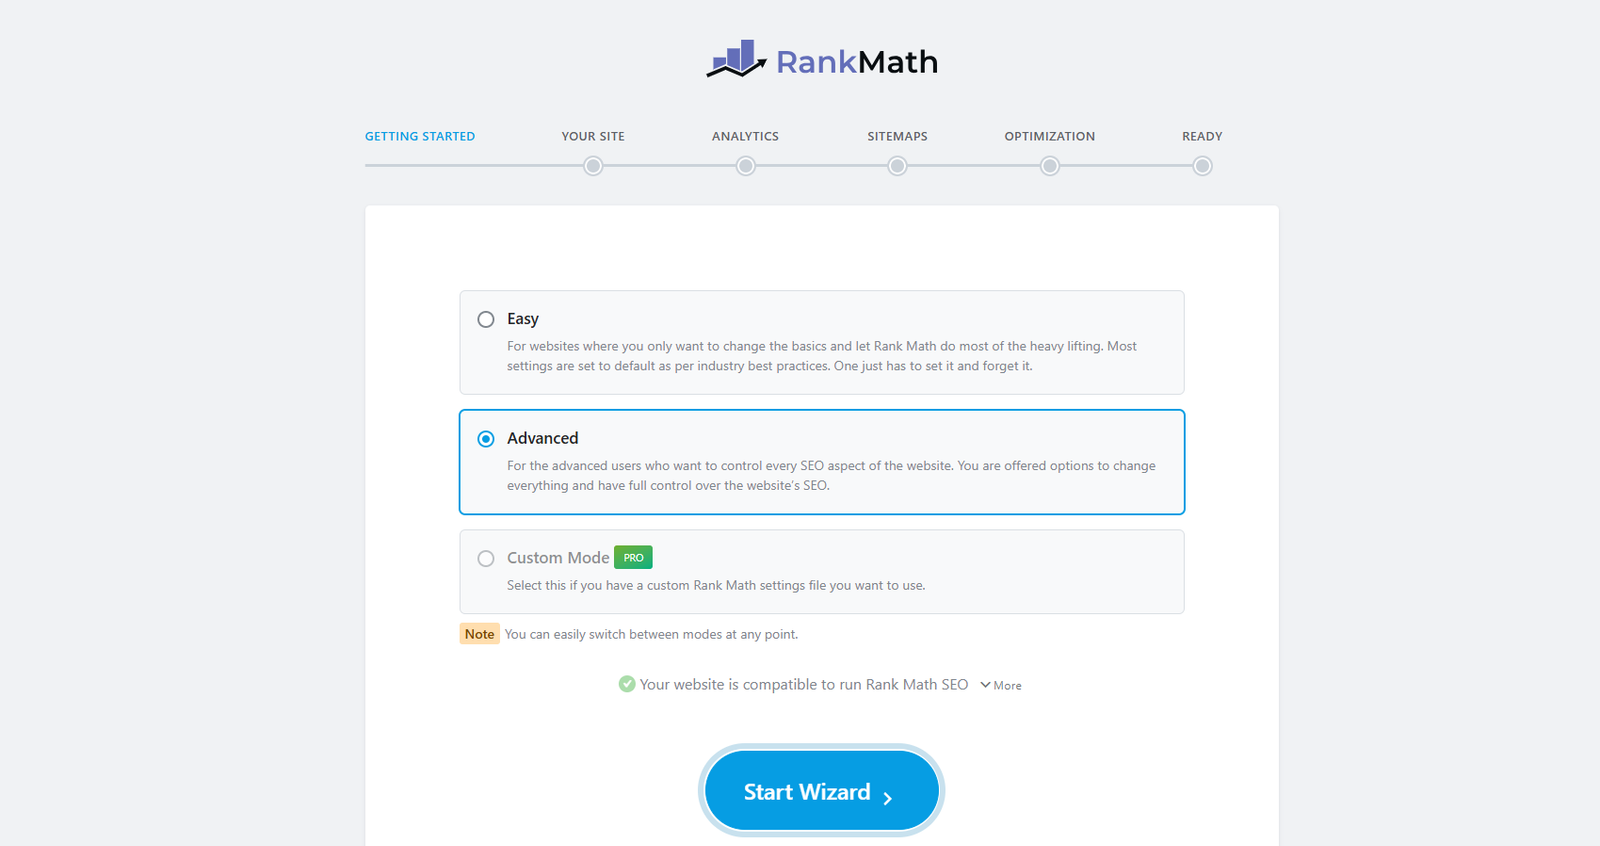
Easy vs Advanced mode. Easy mode applies sensible defaults and hides most module toggles the right call if this is your first SEO plugin. Advanced mode exposes everything from the start, which suits you if you already know which controls you want. You can switch modes later, so don’t agonize.
Site type. Choose blog, business, shop, or portfolio based on your site’s primary purpose. This shapes the default schema Rank Math applies.
Name, logo, and default social image. Upload a square logo for the search appearance step, and a clean 1200×630 pixel image as your social sharing fallback it appears whenever a shared page lacks its own Open Graph image.
Google connection. The wizard offers to connect Search Console and Analytics via an authorization flow. Do it now if you can, because the 30/90-day measurement plan at the end of this guide runs on this data. If you skip it, you can connect later from the Rank Math dashboard with no penalty.
Step 2: Titles, indexing rules, and the settings that touch every page
The wizard creates a working baseline; three global settings deserve a manual check before you publish anything, because correcting them across 50 posts later is far more painful than setting them now.
Title format
Under Rank Math → Titles & Meta → Global Meta, the recommended format for most blogs is %title% %sep% %sitename%, producing results like “How to Research Keywords | Your Blog Name.” One caution: appending the site name adds characters, so keep post titles short enough that the full tag avoids truncation under roughly 60 characters total is the practical target, though Google publishes no hard limit. If Search Console later shows truncated titles, shorten the post title or drop the site name on individual posts via the per-post override.
What to index and what to noindex
This is the most consequential screen in the whole settings area. Under Titles & Meta, set Robots Meta to Index for posts, pages, and categories. Set Noindex for tags, search results pages, 404 pages, and empty archives and turn on Rank Math’s option to automatically noindex empty category and tag archives.
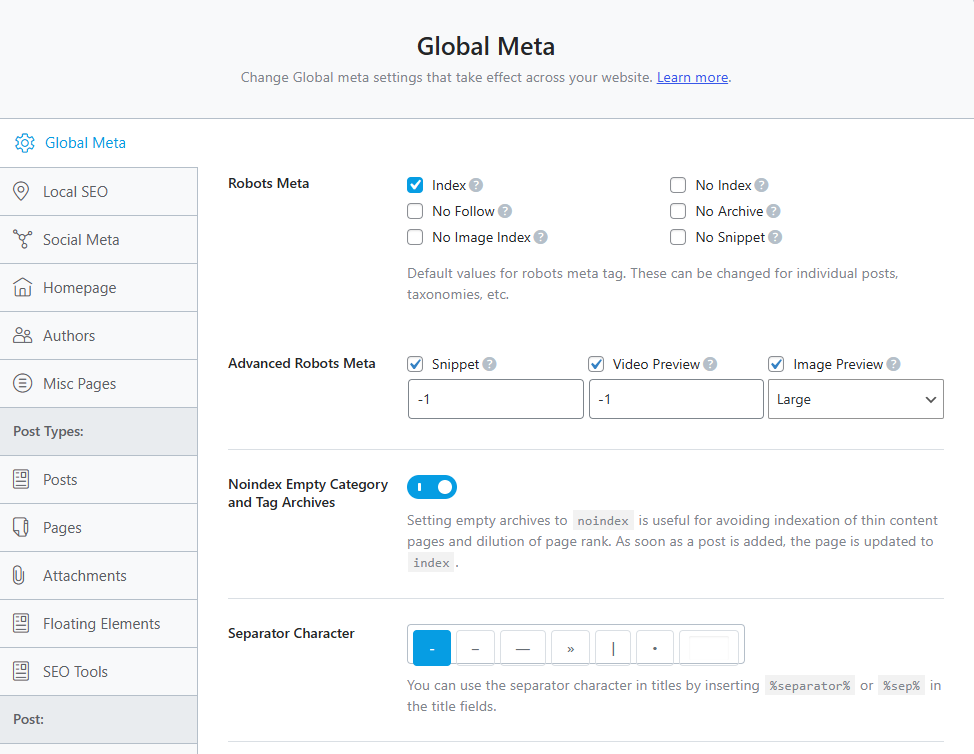
The reasoning: when Google crawls dozens of nearly empty tag pages alongside your real content, it spends crawl attention on pages that can’t rank and reads your site as thinner than it is. Keeping low-value archives out of the index concentrates both crawl budget and quality signals on the pages that matter.
Advanced robots meta
In the Advanced Robots Meta settings, set max-snippet, max-video-preview, and max-image-preview to -1 (unlimited). These are permissive hints telling Google it may use larger image previews and longer snippets for your pages in results. It costs nothing, takes seconds, and richer previews tend to support better click-through rates over time.
Step 3: Configure and submit your XML sitemap
Go to Rank Math → Sitemap Settings and confirm the module is on. Then make three deliberate choices:
What to include. Posts, Pages, and Categories; Products and Product Categories too if you run WooCommerce. Exclude Tags unless you deliberately maintain content-rich tag pages. The sitemap should list only pages you genuinely want ranked anything you’ve noindexed is excluded automatically, so your Step 2 decisions carry through without separate management.
Links per sitemap. Rank Math’s documentation recommends 200 links per sitemap page rather than the maximum, because smaller files are easier for Google to process.
Images. Turn on “Images in Sitemap” and “Include Featured Images.” For tutorial posts with screenshots or affiliate posts with product images, this helps Google discover your visuals for image search a ten-second toggle with real upside.
Then submit it: your sitemap lives at yoursite.com/sitemap_index.xml. In Google Search Console, go to Indexing → Sitemaps, paste the path, and click Submit. Also keep Rank Math’s “Ping Search Engines” option on it notifies Google whenever the sitemap updates, though Google still crawls on its own schedule.
Step 4: Set up schema for rich results
Schema is one of Rank Math’s clearest advantages, and one of the settings beginners skip because it sounds technical. The actual work takes minutes.
Schema markup tells Google explicitly what a page is an article, a product, a recipe, an FAQ instead of leaving it to guess from the HTML. That clarity makes your pages eligible for rich results: star ratings, FAQ dropdowns, how-to previews, breadcrumbs in the SERP. Schema isn’t a direct ranking factor, but rich results typically earn better click-through rates than plain blue links, which means more traffic from the same position.
Global default: under Titles & Meta → Posts, set the Default Schema Type to Article (or BlogPosting for a personal blog). For Pages, WebPage or None. WooCommerce products get Product schema automatically. With the defaults right, every new post inherits correct schema with zero manual work.
Per-post overrides: the Schema Generator in the post editor lets you swap or layer types HowTo for a step-by-step guide, Review or ItemList for a tool comparison, FAQ schema layered on top of Article for a post with a question section. One rule governs all of it: only add schema that accurately describes what’s on the page. Google ignores mismatched markup and can flag it as misleading.
Validate it: run important pages through Google’s Rich Results Test at search.google.com/test/rich-results. Green means Google reads your schema correctly; yellow warnings usually mean missing recommended fields like author or publish date, fixable in the per-page schema editor. Fix warnings on your key pages first.
Step 5: Optimize posts with focus keywords and the SEO score
Now the per-post workflow. Open a post and find the Rank Math panel in the sidebar or the metabox below the editor.
Choosing the focus keyword
Enter the actual search query you want the post to rank for not a topic. “Best budget keyword research tools” is a usable focus keyword; “SEO tools” is a category. This matters because the entire analysis calibrates to what you enter: a specific phrase produces actionable suggestions, a vague one produces noise. The free version supports multiple focus keywords, but additions should be intentional, not habitual one primary keyword keeps the analysis focused.
What the 100-point score actually measures
The score is a composite of on-page checks: keyword in the title, URL, first paragraph, and at least one subheading; content length (posts under 600 words score zero on the length check, over 2,500 scores full marks); internal and external links present; images with alt text; meta description completeness; paragraph length.
Aim for 80+, but treat the individual suggestions as the real guide, not the number. A score of 82 with a weak title will lose to a 75 with a sharp, intent-matching title. The checks that correspond to actual ranking impact are keyword placement in the title and opening paragraph, heading structure, content depth, and internal links. Keyword density and external links are worth passing but are never the reason a post ranks. Diagnose with the checklist; don’t optimize toward an arbitrary number.
The three checks beginners always miss
The same gaps come up with nearly every new Rank Math user, and all three are fast fixes: the focus keyword missing from the meta description (add it naturally), zero internal links (every post should link to at least one related page on your site), and blank image alt text (ten seconds per image, and it matters for both accessibility and image search).
Custom meta descriptions for pages you care about
The global templates handle posts you don’t touch individually, but any page you actually want to rank deserves a hand-written title and description. Aim for 150–160 characters, lead with the reason to click, and work the keyword in naturally. Auto-generated descriptions are a fallback, not a strategy.
Step 6: Content AI and internal linking
Content AI is Rank Math’s most misunderstood feature, so here’s the plain version: it’s a credit-based research and drafting assistant, not a content factory. Free accounts get 750 credits monthly (they don’t roll over), and the pricing is task-based one generated word costs one credit, a keyword research query costs 500, image alt text generation costs 50 per use. In practice, a free account covers about one research session plus light writing help per month.
Used well, it earns its place. The Research tab analyzes top-ranking pages for your focus keyword and returns the word counts, headings, related terms, and common questions they share a competitive briefing before you write. The Write tab and the 40+ AI Tools (meta description options, FAQ generation, outlines, bulk alt text) speed up the repetitive parts. Two habits keep the quality up: make prompts specific (“write a paragraph explaining why internal links matter for SEO, for beginner bloggers” beats “write about SEO”), and treat every output as a first draft check facts, cut anything generic, rewrite anything that doesn’t sound like you.
Internal linking deserves equal attention because it costs nothing. As you write, link to your most comprehensive cornerstone posts using descriptive anchor text never “click here.” Over time this builds a cluster structure where your best content accumulates the most internal authority, which Google reads as topical depth supporting rankings across the whole topic, not just single posts.
Step 7: Redirects, 404 monitoring, and breadcrumbs
This is the maintenance layer that quietly protects rankings while everything else builds them.
404 Monitor. Enable it under Dashboard → Modules. It logs every URL returning a 404 review the log after restructuring your site, changing slugs, or deleting posts. A dead URL with backlinks pointing at it is authority leaking into nothing.
Redirections. When you find a meaningful 404, send it to the closest relevant live page with a 301 redirect (permanent, passes authority). Avoid chains A→B→C dilutes authority and slows crawling and avoid reflexively redirecting everything to the homepage or a category page; if there’s no genuinely relevant destination, not every 404 needs a redirect. This same module is what you’ll use when consolidating or renaming content later, which makes it one of the most valuable free features in the plugin.
Breadcrumbs. Turn them on under General Settings → Breadcrumbs. They clarify your site hierarchy for search engines, reinforce the cluster structure you’re building with internal links, and appear directly in Google results, giving searchers context before the click.
If your site type calls for them, three optional modules are worth enabling and only these: WooCommerce for stores (noindex hidden products, enable SEO controls on product screens, include Products and Product Categories in the sitemap, map GTIN/MPN fields for Shopping visibility), Local SEO for businesses with a physical address (use the most specific business type available and keep name, address, phone, and hours identical to your Google Business Profile), and Video SEO only if video is a genuine content strategy rather than occasional embeds. Every module you don’t need is dashboard clutter leave it off.
Migrating from Yoast (or another plugin) safely
Switching sounds riskier than it is. Your SEO metadata titles, descriptions, focus keywords, canonicals, noindex directives, redirects lives in your database, not inside the plugin. Rank Math’s importer reads it directly from Yoast, AIOSEO, SEOPress, and others, and as long as those signals survive the transfer, Google never notices the switch.
The safe order of operations:
- Take a full site backup.
- Install and activate Rank Math without deactivating your current SEO plugin yet.
- Go to Rank Math → Status & Tools → Import & Export, select your old plugin as the source, and run the import.
- Spot-check your important pages: titles, descriptions, canonical URLs, and noindex settings should all match what you had.
- Confirm existing redirects still work.
Only after that verification should you run Rank Math’s cleanup tool (which permanently deletes the old plugin’s data) and then deactivate and remove the old plugin. Cleaning up before verifying is the one mistake in this process that causes real SEO damage.
The 30/90-day plan: how to know if any of this is working
Configuration without measurement is guesswork, and this is where the Search Console connection from Step 1 pays off Rank Math pulls impressions, clicks, and average position straight into your WordPress dashboard.
Days 1–30: establish your baseline
Don’t expect ranking movement yet; this month is about accurate measurement. Record three numbers: total indexed pages, average position for your target keywords, and most importantly which pages are earning impressions but poor click-through rates. Those pages are your first optimization targets, because Google already shows them; they’re just not compelling enough to earn the click. Rewrite their titles and meta descriptions before touching anything else.
Days 30–60: work the striking distance
Once data accumulates, filter by page and sort by average position. Posts sitting between positions 5 and 20 are your highest-leverage targets close to page one, not there yet. For each: audit the Rank Math score for missed checks, confirm the schema type is right, sharpen the title against actual search intent, and add internal links from your stronger pages pointing toward it.
Day 90: read the signals
Encouraging signs by now: more indexed pages than at launch, keywords moving from page two toward the bottom of page one, modest but growing clicks, and rising average CTR (evidence your title and schema work is landing). If indexed pages are stalling despite new publishing, check your sitemap settings and make sure you haven’t accidentally noindexed content you want ranked. And by day 90 the 404 monitor will have a small log fix the meaningful ones and set a monthly reminder to check it.
Timelines vary enormously by niche, site age, and content quality, so treat these as signals to watch rather than guaranteed milestones. The pattern that wins is unglamorous: consistent small improvements over 90 days beat one-time optimization bursts every time.
The complete workflow, in brief
Install Rank Math and take the wizard seriously. Set title formats and indexing rules globally. Enable the sitemap, include images, submit it to Search Console. Set Article as your default schema and override per-post where a more specific type fits. On every post: specific focus keyword, hand-written title and description, keyword in the intro and one heading, alt text on images, at least one internal link. Keep the 404 monitor and redirect module active underneath it all. Then measure on the 30/90-day rhythm and put your effort where the data points.
None of it requires code, and none of it is a magic setting it’s the basics done consistently, which is precisely what most sites in your niche aren’t doing. For the layer beneath the plugin, our technical SEO checklist covers what Rank Math can’t fix for you.