
You install Yoast SEO, the plugin activates, and suddenly your dashboard has a new menu full of toggles, tabs, and colored dots you’ve never seen before. Most beginners react in one of two ways: they close the tab and leave everything on defaults, or they click around at random and hope nothing breaks. Both approaches quietly cost you rankings, because an unconfigured Yoast install sends Google incomplete signals and a misconfigured one can send contradictory ones.
This guide fixes that. It covers what Yoast actually does for your site (and what it can’t do), how to install it, how to work through the configuration wizard and every settings panel that matters, and how to optimize an individual post using the analysis tools. When you finish, you’ll have a fully configured plugin, a working sitemap, a verified Google Search Console connection, and a repeatable optimization process for every post you publish.
Still deciding between Yoast and Rank Math? Read our Rank Math vs Yoast comparison first. If you’ve already chosen Yoast, let’s get to work.
What Yoast SEO actually does (and what it won’t do)
Out of the box, WordPress publishes your content as plain HTML with very little context for search engines, no structured description of what each page is, who runs the site, or which URLs deserve crawling priority. Yoast fills that gap. It automatically adds meta tags, schema structured data, XML sitemaps, and canonical URLs to everything you publish.
A useful way to picture it: WordPress builds the house, and Yoast puts up the street sign, the house number, and the mailbox so search engines can find it, understand it, and describe it accurately in results.
What Yoast will not do is rank your content for you. Google decides rankings based on content quality, relevance, links, and user engagement. Yoast makes sure that when you do earn those signals, they’re communicated to Google cleanly. It’s a preparation layer, not a shortcut and setting that expectation now will save you a lot of frustration with the colored dots later.
Concretely, the plugin handles four jobs:
- Search appearance you control the title and description Google shows for every page.
- Crawling and indexing automatic XML sitemaps and canonical tags tell Google what to crawl and what to ignore.
- Structured data schema markup makes your pages eligible for rich results like breadcrumbs and article enhancements.
- Content coaching SEO and readability analysis checks your on-page SEO basics while you write.
Free vs Premium: what you actually need
The free version includes everything this tutorial covers: SEO and readability analysis, SERP previews, XML sitemaps, canonical URLs, schema markup, breadcrumb support, and Open Graph social metadata. The 2026 releases also added LLMs.txt management for controlling AI crawler access, a sign the plugin is keeping pace with how content gets discovered now.
Premium (around $119/year for one site, check Yoast’s pricing page for current rates) adds five focus keyphrases per post instead of one, internal linking suggestions, a redirect manager, AI-generated titles and descriptions, and bundled Local/Video/News SEO add-ons.
Here’s the honest recommendation: if your site is in its first year, stay on free. The redirect manager becomes valuable when you’re restructuring URLs at scale; multi-keyphrase optimization matters once you have a content library worth cross-linking. Buying Premium before you’ve mastered the free workflow is buying a professional camera before you know how to frame a shot. Revisit the decision when you can name the specific free-version limitation slowing you down.
One thing to do before installing
Yoast conflicts directly with other all-in-one SEO plugins. Running it alongside Rank Math, All in One SEO, or SEOPress produces duplicate title tags, competing canonicals, and multiple sitemaps, a mess that’s hard to diagnose later. Go to Plugins in your dashboard and deactivate any other SEO plugin first. You don’t have to delete it, but it must be inactive.
Step 1: Install the plugin
In your WordPress admin, go to Plugins → Add New Plugin and search for “Yoast SEO.” Look for the listing by Team Yoast with 10+ million active installs. Click Install Now, then Activate.
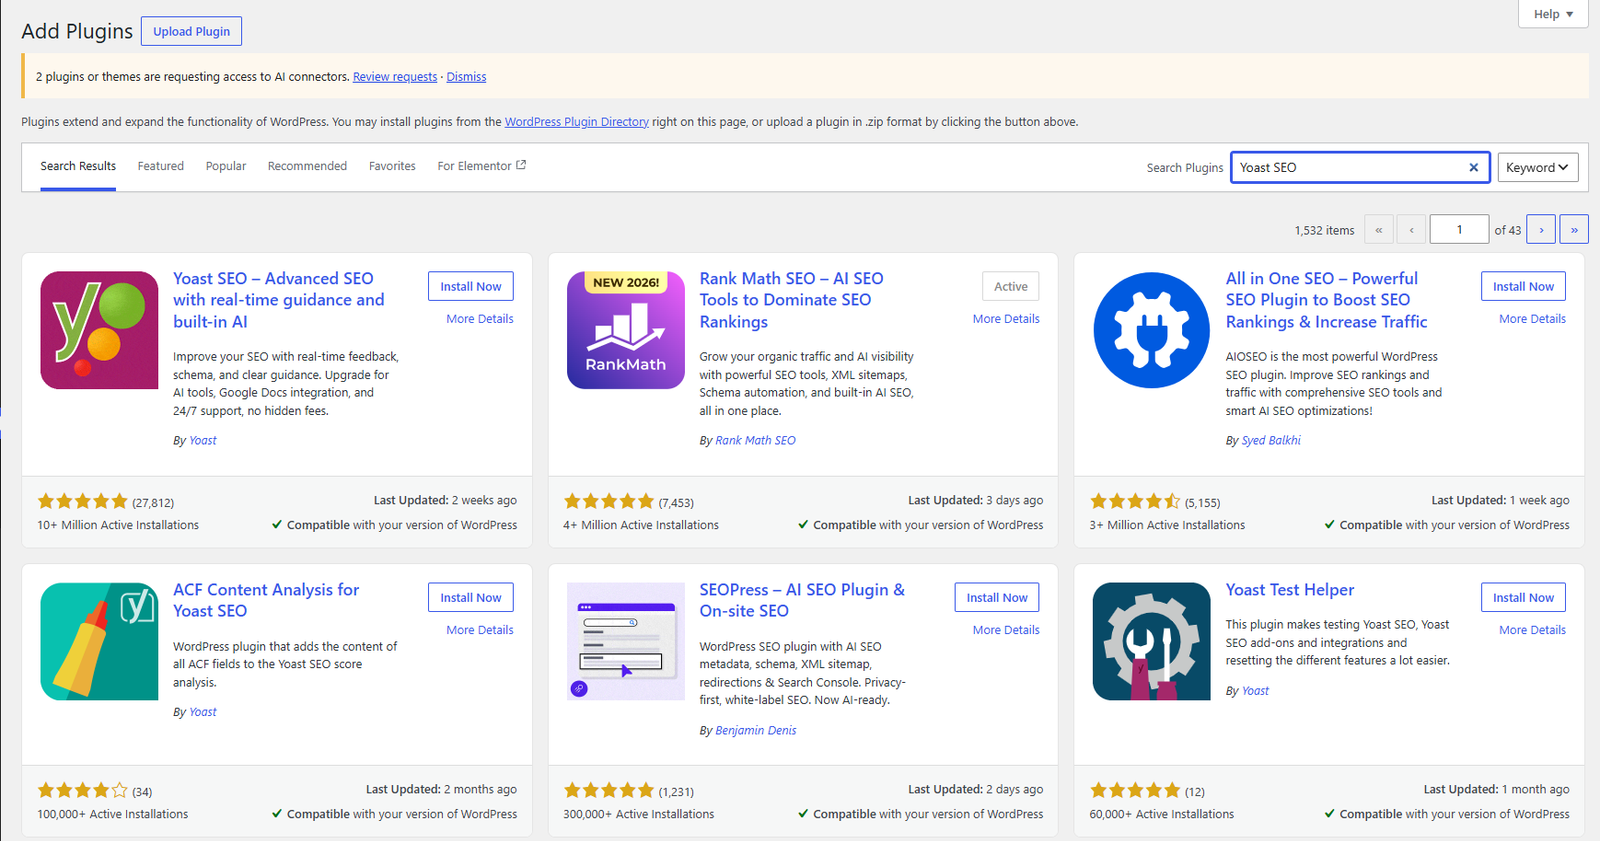
If your host restricts the built-in installer, download the ZIP from WordPress.org and upload it via Plugins → Add New Plugin → Upload Plugin.
After activation, a “Yoast SEO” item appears in your left sidebar and the plugin prompts you to run the first-time configuration. Nothing on your live site has changed yet no metadata is being customized and nothing can break. That’s what the wizard is for.
Step 2: Run the first-time configuration wizard
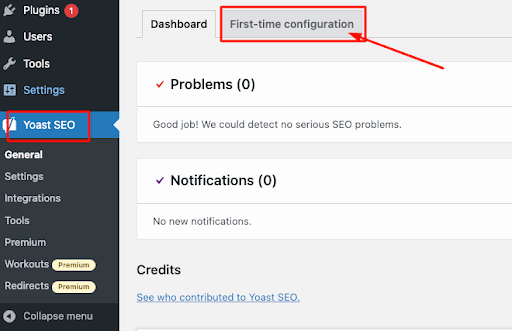
Go to Yoast SEO → General → First-time configuration and click Start. On sites with existing content, Yoast may first run a data optimization scan to index your published posts let it finish before proceeding. The wizard walks through five decisions, and two of them shape everything else.
Site representation: Organization or Person. This is the most consequential choice in the wizard because it determines the schema markup Yoast attaches to your entire site. A business, agency, store, or nonprofit should choose Organization and enter the real business name (not the domain name) plus an actual logo at reasonable resolution not a banner or social header. A solo blogger, freelancer, or personal brand should choose Person and enter their real name and photo. Get this wrong and Google receives a contradictory identity signal on every page, which undermines Knowledge Panel eligibility and the E-E-A-T picture you’re trying to build. You can change it later, but getting it right now saves cleanup.
Site type and environment. Set the environment to public/live unless the site is genuinely still in staging. For site type, pick the closest honest match blog, online store, news site, portfolio because Yoast uses it to apply the right default schema across your content.
Social profiles. Enter the URLs of profiles you actively maintain. These go into your structured data and help Google connect your site to your social presence. An abandoned profile URL is worse than a blank field, so be selective.
The wizard also offers tracking preferences and a Search Console connection we’ll handle Search Console properly in Step 6. And remember: finishing the wizard is the start of configuration, not the end. Every choice can be revisited in the settings menus.
Step 3: Configure Search Appearance for every content type
This is the section most beginners skip, and it’s where the biggest indexing mistakes happen. Go to Yoast SEO → Settings → Content types and work through each item.
Homepage
Set a custom SEO title and meta description manually the homepage should never run on a template. The title should combine your main topic and brand: “Simple Home Cooking Recipes | Dinner Ideas for Busy Families.” The description should state your value to a searcher in one or two concrete sentences: “Find quick weeknight dinner recipes, easy meal prep ideas, and beginner-friendly cooking guides updated weekly.”
Title templates for posts and pages
For everything except the homepage, Yoast generates titles from templates using variables like %%title%%, %%sep%%, and %%sitename%%. The clean default %%title%% %%sep%% %%sitename%% produces results like “How to Do Keyword Research | AISEO Round Table.” Set your separator character deliberately here rather than accepting whatever shipped with the install.
What to index and what to noindex
Every content type and archive has a “Show in search results” toggle. Setting it to “no” applies a noindex tag to every page of that type, so make these decisions deliberately. Here’s the reference configuration for a typical blog or small business site:
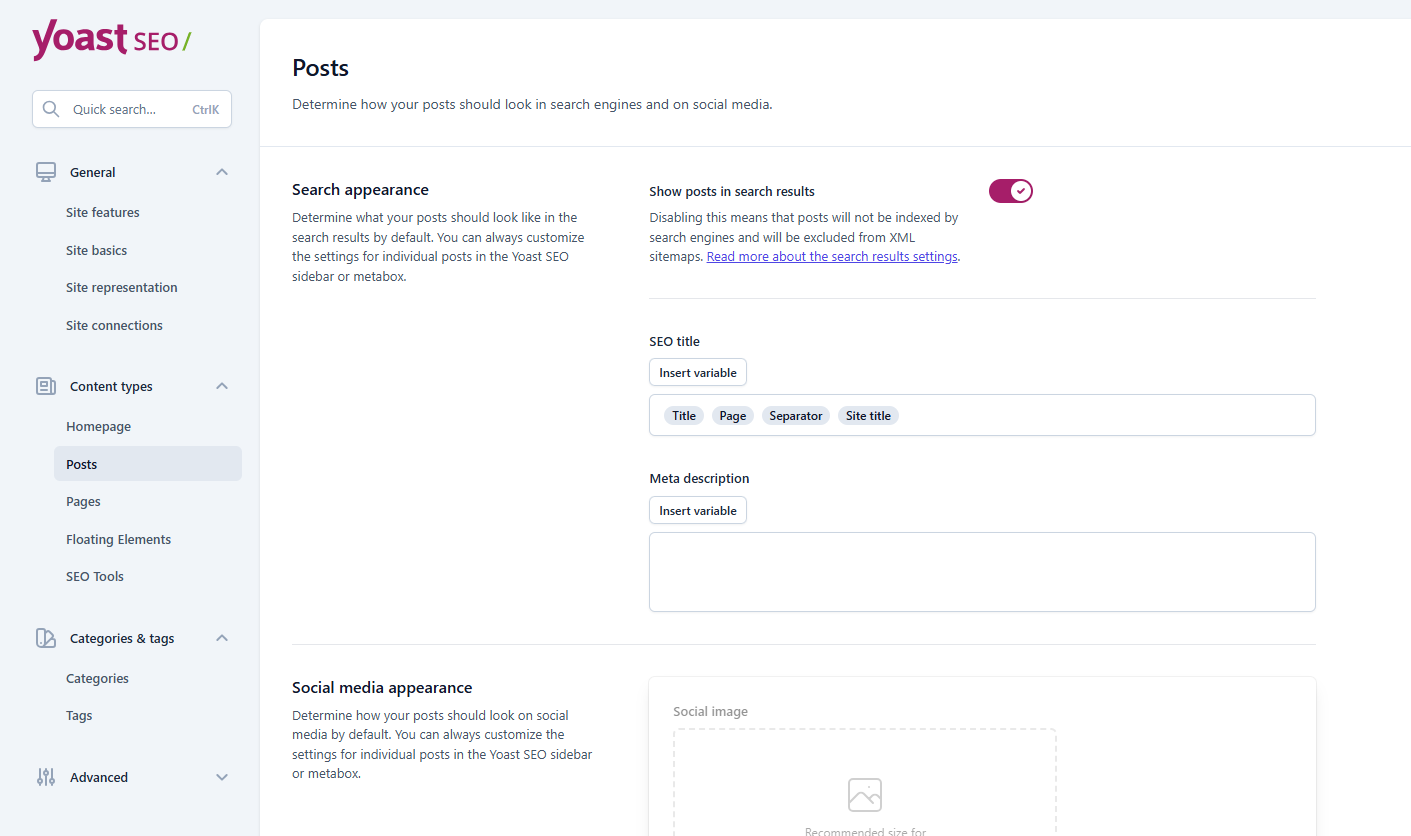
Posts and pages: index. This is your actual content.
- Media/attachment pages: noindex, always. WordPress creates a near-empty page for every uploaded file; left indexable, these become hundreds of thin pages diluting your site’s quality signals. This is the single most common misconfiguration check it now.
- Categories: index if they’re coherent topic hubs with enough posts; noindex sparse ones.
- Tags: noindex unless you curate them carefully. Most blogs use tags inconsistently, producing one-post archives with no search value.
- Author archives: disable on single-author sites the archive is just a duplicate of your blog listing. Worth indexing only on multi-author sites with real author bios.
- Date and format archives: disable. They group posts by publish date rather than topic and serve no search intent.
- Custom post types (testimonials, team members, etc.): noindex unless the pages genuinely work as standalone search landing pages.
The principle behind every one of these calls: does this page provide unique value to someone landing on it from Google? If it’s just a re-listing of content available elsewhere on your site, keep it out of the index.
Step 4: Sitemaps, canonicals, and keeping your signals consistent
Your XML sitemap
Yoast generates a sitemap automatically the moment you activate it. Find it at yourdomain.com/sitemap_index.xml you’ll see an index file linking to separate sitemaps per content type (posts, pages, categories), each holding up to 1,000 URLs. This split structure helps Google crawl efficiently.
The best part is the automation: any page you set to noindex is automatically removed from the sitemap. You don’t maintain anything manually which is exactly why the indexing decisions in Step 3 matter so much. The sitemap simply reflects them.
If the sitemap URL returns a 404, the fix is almost always a permalink flush: go to Settings → Permalinks and click Save Changes without changing anything. This rebuilds WordPress’s rewrite rules and resolves the issue in most cases.
Canonical tags
Every indexable page gets a self-referencing canonical tag automatically a signal telling Google “this URL is the preferred version of this content.” That default is correct for almost every site. The Advanced tab on individual posts lets you override it, but the legitimate use cases are narrow: syndicated content where signals should flow to the original, or consolidating near-duplicate pages. If you find yourself setting custom canonicals regularly, the real problem is your site architecture, not your canonical tags.
The conflicting-signals trap
The mistake that causes genuinely unpredictable indexing is sending Google contradictory instructions a page marked noindex that still appears in a submitted sitemap, or vice versa. Yoast prevents this automatically as long as you don’t manually override its behavior. Periodically check Google Search Console’s Pages report for entries flagged “Submitted URL marked noindex” and fix any you find by aligning the setting with your actual intent.
Step 5: Social metadata
Under Yoast SEO → Settings → Social, well, first understand the distinction: your SEO title is what Google shows; your social title and image are what Facebook, LinkedIn, and X show when someone shares your link. They’re separate fields and often should differ.
Set a sitewide default social image of at least 1200×630 pixels a logo on a clean background works; anything with small text becomes unreadable at card size. This default guarantees every shared link gets a visual even when a post lacks a featured image.
Then, per post, the Yoast panel includes Facebook and X tabs where you can override the image and title for that specific piece. Thirty seconds per post here prevents awkwardly cropped or missing thumbnails when your content travels on social a small habit with a visible payoff.
Step 6: Connect Google Search Console and submit your sitemap
This connection turns your configuration into feedback: crawl data, indexing status, and the search queries that actually bring people to your site.
- In Google Search Console, add your site as a property and choose the HTML tag verification method. Copy the content value from the tag Google shows you.
- In WordPress, go to Yoast SEO → Settings → Site connections, paste the value into the Google field (just the value string, not the whole HTML tag), and save.
- Back in Search Console, click Verify.
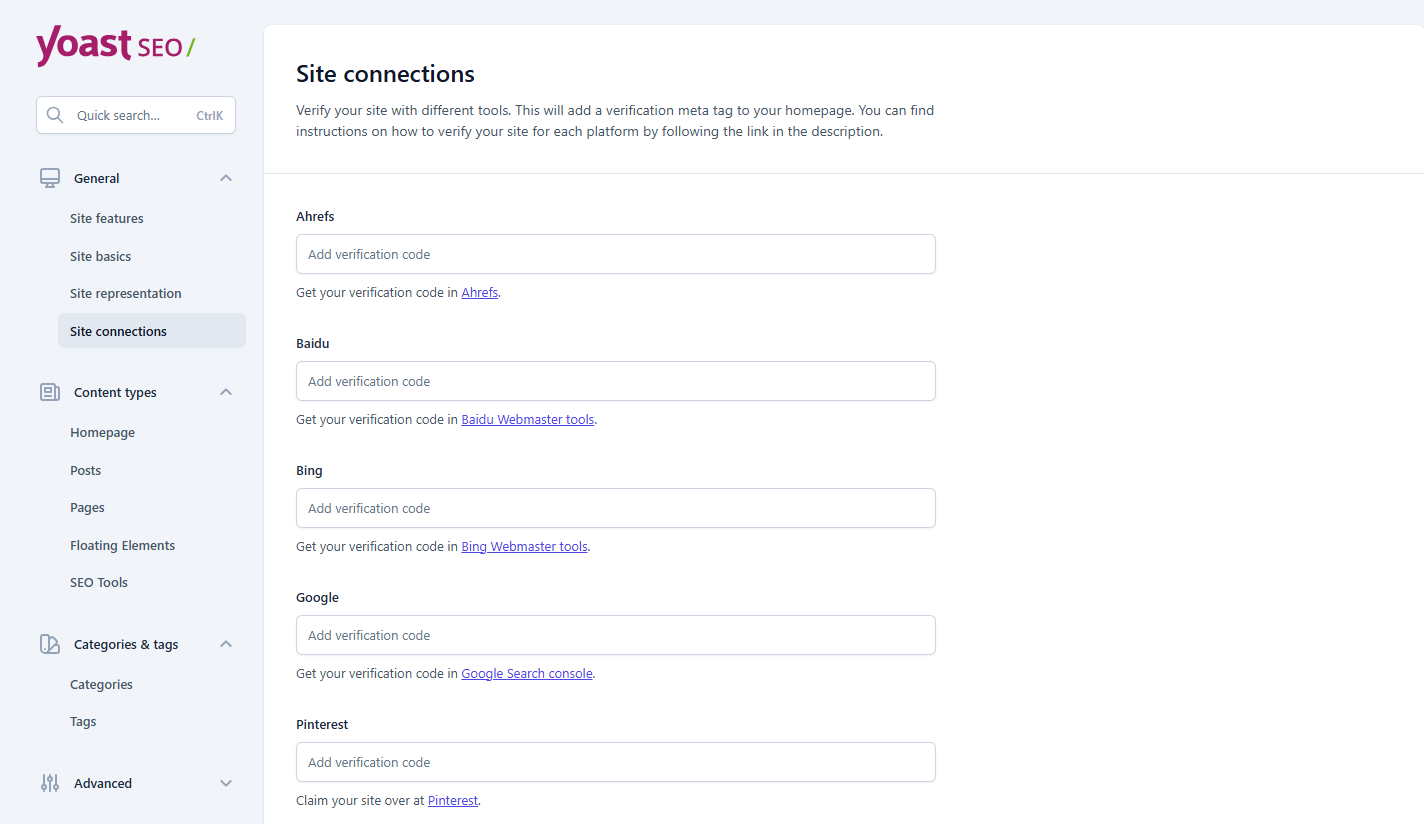
Once verified, go to Indexing → Sitemaps in Search Console, paste yourdomain.com/sitemap_index.xml, and submit. Google now has a clean map of every indexable page on your site, which speeds up discovery of new posts and surfaces indexing problems early.
Step 7: Optimize a post with Yoast’s SEO analysis
Configuration done now the workflow you’ll repeat on every post. Open any post and find the Yoast panel below the editor or in the sidebar. We’ll use an example post about “home composting tips” throughout.
Focus keyphrase and the traffic lights
Enter the exact phrase you want the post to rank for here, home composting tips in the focus keyphrase field. Yoast then checks whether the phrase appears in the places that matter and grades the post with its traffic-light system: green for passing, orange for room to improve, red for failing.
Understand what that dot is before you chase it: the score is a content checklist, not a ranking factor Google can see. A green dot means you followed Yoast’s on-page checklist; it does not mean you’ll rank. A post with two orange signals and genuinely useful content will beat a keyword-stuffed post with all-green lights every time. Use the checks to catch what you forgot, not to dictate your writing.
The three fields that drive clicks
The SEO title, meta description, and URL slug most directly affect whether searchers click your result, so they deserve the most attention:
- SEO title: put the keyphrase near the front and stay within the length bar Yoast shows. “Home Composting Tips: Start a Simple Compost Bin Today” keyphrase leads, promise is specific.
- Meta description: mention the keyphrase once, state the benefit, stay under ~160 characters. “Learn home composting tips to reduce waste, improve soil, and build a simple compost system at home.”
- Slug: short, readable, keyphrase-inclusive.
/home-composting-tips/drop stop words like “a,” “the,” and “how-to” unless removing them makes the URL confusing.
Note that Google sometimes rewrites titles and descriptions at its own discretion, so treat the snippet preview as a strong guide rather than a guarantee.
Keyphrase placement in the content
Yoast checks for the keyphrase in your introduction, at least one subheading, and image alt text. All three can be satisfied naturally: an intro line like “These home composting tips will help you turn kitchen scraps into rich soil without a large yard,” a heading like “Home composting tips for beginners,” and alt text like “compost bin with kitchen scraps for home composting.”
If forcing the phrase somewhere makes the writing awkward, write it clearly and accept the orange light. Forced placement hurts readers and reader experience is the thing Google actually measures.
Step 8: Use the readability analysis (without being ruled by it)
The readability tab runs a separate set of checks: sentence length, paragraph length, passive voice, transition words, subheading distribution, and a Flesch Reading Ease score (a standard formula based on sentence length and syllables per word, where 60+ is the usual target for web content).
The common failures have simple fixes. Long sentences: break at a conjunction. Passive voice: put the actor first. Few transition words: add connectors like “as a result” or “for example” where ideas shift. Too few subheadings: drop in an H3 every three to four paragraphs.
Here’s what that looks like in practice. Before: “Composting can be difficult for beginners because many people do not know which materials are suitable and the process can become unpleasant if it is not managed correctly.” After: “Composting is easier than it looks. Start with fruit scraps, leaves, and paper. Avoid meat and dairy. Turn the pile regularly to control odor.” Shorter, more direct, and more useful the readability win and the reader win are the same win.
But apply judgment: technical tutorials, legal content, and formal writing often need complex sentences and passive constructions for accuracy. A check that stays orange because fixing it would make the writing worse is a check worth leaving orange. Aim for green on sentence length and passive voice; treat the rest as a second-pass editing prompt.
Troubleshooting: the problems you’ll actually hit
Duplicate meta tags. Almost always caused by a second SEO plugin running alongside Yoast. View your page source and search for multiple title or canonical tags to confirm, then deactivate the other plugin. There is no scenario where two SEO plugins beat one configured correctly.
Theme title conflicts. Older themes sometimes output their own title tags. Modern themes handle this via add_theme_support( 'title-tag' ) in functions.php; if you’re on a very old or custom theme and see doubled titles, that’s the first place to look.
Wizard fails or metadata looks wrong. Check for an http/https mismatch: the site URL in Settings → General must exactly match how your site actually loads, protocol included. If that’s fine, deactivate all non-Yoast plugins and retest; if the problem disappears, reactivate them one at a time to find the conflict. Switching temporarily to a default theme like Twenty Twenty-Four rules out theme interference.
Sitemap 404. Permalink flush, as covered in Step 4.
A check that won’t turn green. Sometimes that’s correct behavior. Yoast’s analysis is a guide, not a grade Google sees leave it orange and move on.
Is Yoast the right plugin for you?
For beginners and intermediate site owners who want a reliable, thoroughly documented plugin with a huge support community, Yoast is a sound default, and the free tier covers a new site’s needs for at least its first year. It’s not the only strong option, though: Rank Math ships more features free (multiple keyphrases, more schema types), and other plugins bundle redirect management without a paid tier. If you’re weighing the field, our full SEO plugin comparison breaks down Yoast, Rank Math, AIOSEO, and SEOPress by features, speed, and price and keep in mind that switching plugins mid-site carries migration overhead, so it’s worth choosing deliberately once.
Your setup checklist
Everything in this tutorial reduces to a sequence you can run in about an hour:
- Deactivate any other SEO plugin, then install and activate Yoast
- Run the first-time configuration wizard get site representation (Organization vs Person) right
- Set your homepage title and description manually
- Work through Content types: index posts and pages, noindex media pages, disable date/format archives and (on single-author sites) author archives
- Set a 1200×630 default social image
- Verify Google Search Console and submit
sitemap_index.xml - For every post going forward: focus keyphrase → title, description, slug → keyphrase in intro, one heading, and alt text → readability second pass
That last step, repeated across dozens of posts over months, is what actually compounds. The plugin handles the technical signals; the content behind them determines whether the rankings follow. For the next layer of your foundation, our technical SEO checklist picks up where the plugin’s job ends.